Data Labeling Best Practices for High-Quality Training Data
This comprehensive guide demystifies data labeling, the crucial process of preparing training data for machine learning models. You'll learn why high-quality labeled data is more important than complex algorithms for AI success, with studies showing data quality accounts for up to 80% of model performance. We break down the entire labeling workflow into manageable steps, from planning and annotation to quality assurance. The article provides practical strategies for creating effective labeling guidelines, managing labeling teams, selecting the right tools, and implementing continuous improvement processes. Special attention is given to handling ambiguous cases, mitigating bias, and maintaining consistency—common challenges that beginners often overlook. Whether you're working on computer vision, natural language processing, or other AI projects, this guide offers actionable best practices that balance quality, cost, and speed.
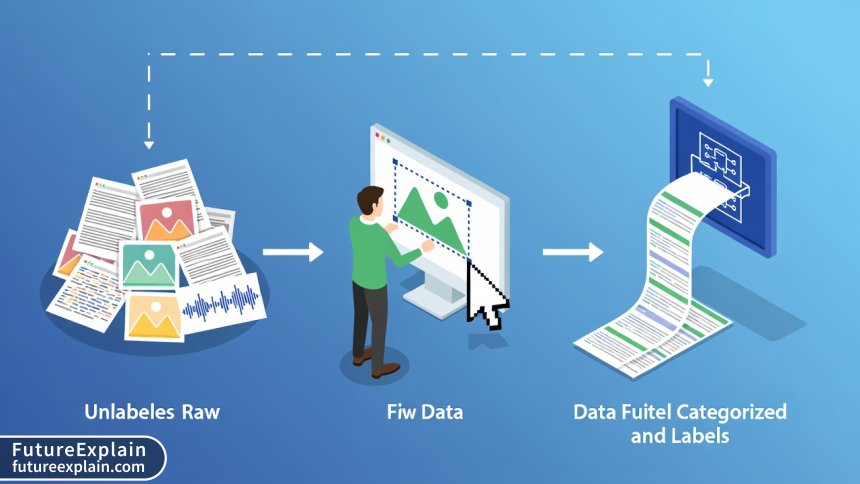
If you're exploring machine learning, you've probably heard that "data is the new oil"—the fuel that powers artificial intelligence systems. But just as crude oil needs refining to become useful, raw data requires careful preparation before it can train effective AI models. This preparation process is called data labeling (also known as data annotation or tagging), and it's one of the most critical yet overlooked aspects of AI development.
Consider this: a sophisticated algorithm trained on poorly labeled data will almost always perform worse than a simple algorithm trained on excellent data. Industry experts estimate that data scientists spend up to 80% of their time preparing and managing data, with labeling being a substantial portion of that work[citation:6]. Whether you're building a computer vision system to detect manufacturing defects, a natural language model to analyze customer feedback, or a recommendation system for e-commerce, the quality of your labeled data directly determines your AI's capabilities and limitations.
This guide will walk you through data labeling best practices in clear, practical terms. You'll learn not just how to label data, but how to build efficient labeling processes that produce consistent, high-quality training datasets. We'll cover everything from planning your labeling project to managing teams, selecting tools, and maintaining your datasets over time.
What is Data Labeling and Why Does It Matter?
At its core, data labeling is the process of adding meaningful tags, annotations, or labels to raw data so that machine learning algorithms can learn from it. These labels serve as "ground truth"—the correct answers that help the algorithm understand patterns and make predictions. For example:
- Drawing bounding boxes around vehicles in street images for autonomous driving systems
- Tagging customer service emails by issue type for classification models
- Transcribing and timestamping speech in audio recordings for voice assistants
- Identifying and categorizing entities in text documents (names, dates, locations)
Data labeling bridges the gap between human understanding and machine learning. As Carnegie Mellon University researchers explain, machine learning systems don't "understand" content in the human sense—they identify statistical patterns between inputs and labeled outputs[citation:9]. The labels provide the essential context that transforms raw pixels, text, or audio into learnable examples.
Effective data labeling isn't just an isolated task—it's integrated throughout the machine learning lifecycle. It begins during problem definition, continues through model development, and extends into maintenance as models encounter new scenarios. This continuous relationship between data quality and model performance means labeling should be viewed as an ongoing investment, not a one-time cost.
The Data Labeling Workflow: A Step-by-Step Framework
A structured approach to data labeling prevents costly rework and ensures consistent results. Here's a comprehensive workflow that scales from small projects to enterprise initiatives:
Phase 1: Project Planning and Definition
Before labeling a single item, invest time in careful planning. Rushing into annotation without clear guidelines is the most common mistake beginners make.
Define Your Objectives Clearly: Start by asking: "What exactly do I want my model to predict or recognize?" Be as specific as possible. Instead of "identify objects in photos," specify "identify ripe vs. unripe strawberries in farm images taken under natural lighting conditions." The more precise your goal, the easier it is to create effective labeling instructions.
Establish Your Label Taxonomy: Create a hierarchical structure of labels that covers all possible cases without overlap. For instance, a vehicle detection system might have categories like: Car → Sedan, SUV, Truck; Motorcycle; Bicycle; Emergency Vehicle → Ambulance, Fire Truck, Police Car. Include an "Other" or "Uncertain" category for edge cases, but define what belongs there.
Determine Labeling Granularity: Decide how detailed your annotations need to be. For object detection, will you use bounding boxes (faster, less precise) or pixel-level segmentation (slower, more precise)? For text, will you label at the document, paragraph, sentence, or word level? More granularity increases accuracy but also increases cost and time.
Phase 2: Data Collection and Preparation
The quality of your source data constrains your labeling outcomes. As the computing principle states: "Garbage in, garbage out."
Source Representative Data: Collect data that matches real-world conditions where your model will operate. If your facial recognition system needs to work in low light, include low-light images in your dataset. Aim for diversity across relevant dimensions: different lighting conditions, angles, backgrounds, dialects, writing styles, or recording qualities.
Clean and Organize Your Data: Remove corrupted files, duplicates, and irrelevant samples. For images, consider basic preprocessing like normalization or resizing. Organize data into logical batches that can be distributed to labelers. This upfront effort prevents confusion and inconsistency during annotation.
Split Your Data Strategically: Divide your data into three sets before labeling:
- Training Set (70-80%): The main data used to teach your model
- Validation Set (10-15%): Used to tune model parameters and compare versions
- Test Set (10-15%): Used only for final evaluation; should remain untouched during development
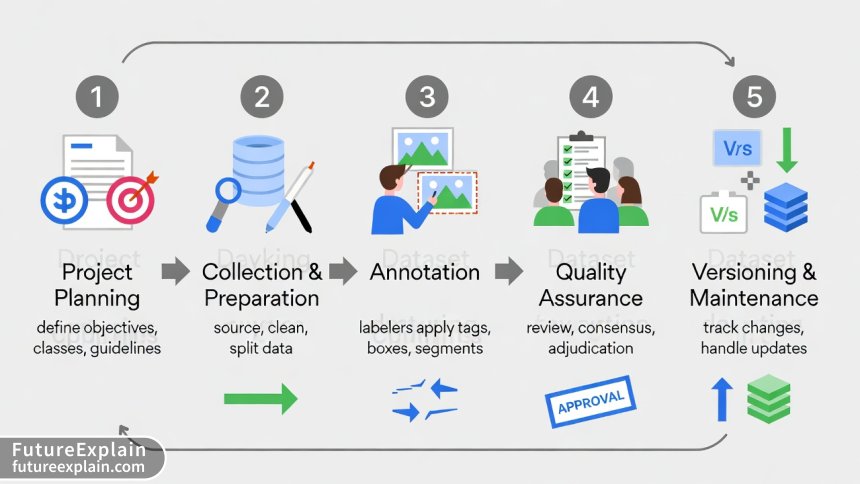
Phase 3: Annotation and Labeling
This is where raw data transforms into training examples. Consistency across labelers and over time is the paramount concern.
Create Comprehensive Labeling Guidelines: Document every decision rule with examples. Good guidelines include:
- Clear definitions of each label with visual/text examples
- Edge cases and how to handle them
- Annotation specifications (how tight should bounding boxes be?)
- Quality standards and acceptance criteria
- Troubleshooting common questions
Implement Pilot Labeling: Have a small team label 50-100 samples before full-scale annotation. Review these samples carefully to identify ambiguities in your guidelines, tools, or processes. This small investment catches problems early when they're cheap to fix.
Manage Labeling Teams Effectively: Whether using internal staff, crowdsourcing platforms, or specialized vendors, clear communication is essential. Provide regular feedback, maintain open channels for questions, and recognize good work. For complex tasks, consider specialized training sessions rather than just written instructions.
Phase 4: Quality Assurance and Validation
Assuming labels are correct without verification is a recipe for model failure. Build multiple quality checks into your process.
Implement Multi-Stage Review:
- Initial Quality Check: Automated or quick human review of all submissions for obvious errors
- Detailed Review: Expert examination of a statistically significant sample (typically 10-25%)
- Adjudication: Resolution of disagreements between labelers or reviewers
Use Consensus Labeling for Critical Tasks: Have multiple labelers annotate the same item independently, then resolve differences. Research shows that for subjective tasks, having 3-5 independent labelers and using majority voting or expert adjudication significantly improves accuracy. This is especially valuable for medical imaging, content moderation, or other high-stakes applications.
Calculate and Monitor Agreement Metrics: Use statistical measures like Cohen's Kappa (for categorical labels) or Intraclass Correlation Coefficient (for continuous measures) to quantify how well labelers agree with each other and with gold standard answers. Track these metrics over time to detect drifts in understanding or performance.
Phase 5: Dataset Maintenance and Versioning
Your labeled dataset isn't a one-time artifact—it's a living resource that will evolve alongside your models.
Implement Version Control: Use systems like DVC (Data Version Control) or Git LFS to track changes to your datasets. Each version should include:
- The data files and labels
- The specific guidelines used
- Information about labelers and review process
- Performance metrics of models trained on this version
Plan for Ongoing Labeling: As your model encounters new scenarios in production, you'll need to label additional examples to improve it. Establish processes for collecting problematic cases, prioritizing what to label next, and efficiently incorporating new data into existing datasets.
Creating Effective Labeling Guidelines: The Foundation of Quality
Your labeling guidelines document is perhaps the most important tool for ensuring consistency. Here's how to create guidelines that actually work:
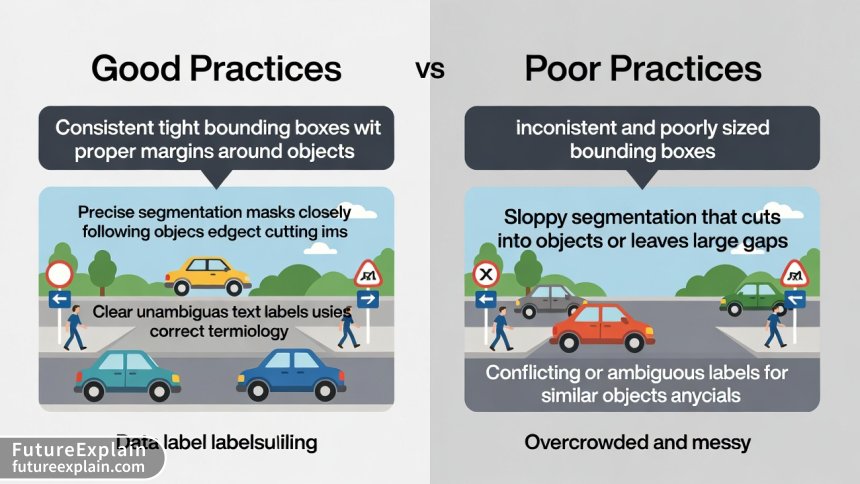
Start with the "Why": Explain the purpose behind labeling decisions. When labelers understand how their work will be used, they make better judgment calls on edge cases. For example: "We need tight bounding boxes because loose boxes would include too much background, confusing the model about what features belong to the object."
Use Visual Examples Liberally: For image and video labeling, show multiple examples of correct and incorrect annotations. Use arrows, circles, and callouts to highlight specific features. For text labeling, provide annotated examples showing exactly which words receive which labels.
Address Ambiguity Head-On: Every labeling project encounters ambiguous cases. Document how to handle common ambiguities:
- Partially visible objects: Label if more than X% visible? Which specific features must be visible?
- Overlapping objects: How to handle occlusion? Label what's visible or infer full object?
- Borderline category membership: Clear rules for deciding between similar categories
Include a "Frequently Asked Questions" Section: As labelers work, they'll encounter unexpected situations. Maintain a shared FAQ that grows organically. This becomes invaluable for new labelers and helps achieve consistency across your team.
Selecting the Right Labeling Approach for Your Project
Different projects require different labeling strategies. Consider these factors when choosing your approach:
Internal Labeling Teams: Using your own employees offers maximum control and domain expertise but limits scalability. Best for:
- Projects requiring specialized knowledge (medical, legal, technical)
- Highly confidential data that cannot leave your organization
- Small-scale or pilot projects where communication overhead is manageable
Crowdsourcing Platforms: Services like Amazon Mechanical Turk, Scale AI, or Appen provide access to large pools of labelers at competitive prices. Best for:
- Large-volume projects with straightforward tasks
- Tasks requiring diverse cultural or demographic perspectives
- Projects needing rapid scaling up or down
Specialized Labeling Services: Companies that focus exclusively on data annotation often provide higher quality for complex tasks but at higher cost. Best for:
- Mission-critical applications (autonomous vehicles, medical diagnostics)
- Tasks requiring significant training or certification
- Projects where you lack internal labeling management expertise
Automated and AI-Assisted Labeling: Emerging tools use existing models to suggest labels, which humans then verify or correct. This approach, sometimes called "human-in-the-loop" labeling, can dramatically speed up the process. Best for:
- Projects with some existing labeled data to train initial models
- Tasks where patterns are relatively consistent and predictable
- Situations where you're iteratively improving models and datasets together
Tools and Technologies for Efficient Labeling
The right tools can make your labeling process significantly more efficient and accurate. Here's an overview of what's available:
Open Source Labeling Tools:
- LabelImg and LabelStudio: Popular for image bounding boxes and classification
- CVAT (Computer Vision Annotation Tool): Advanced features for video interpolation and 3D annotation
- Prodigy: A scriptable annotation tool with active learning capabilities
Commercial Labeling Platforms:
- Scale AI, Labelbox, Supervisely: End-to-end platforms with workforce management, QA features, and integrations
- Amazon SageMaker Ground Truth: Integrated with AWS ecosystem, offers automated labeling
- Google Cloud Data Labeling Service: Managed service with human labelers
Key Features to Look For:
- Collaboration capabilities: Multiple labelers working simultaneously with change tracking
- Quality control tools: Built-in review workflows, agreement metrics, and audit trails
- Automation features: AI-assisted labeling, keyboard shortcuts, template applications
- Export flexibility: Support for multiple data formats used by different ML frameworks
- Integration options: APIs for connecting to your data storage and ML pipelines
Managing Labeling Teams and Ensuring Consistency
Whether you're working with three specialists or three hundred crowd workers, effective team management determines your labeling quality.
Onboarding and Training: Don't assume labelers will perfectly understand your guidelines from documentation alone. Conduct interactive training sessions using sample data. Include a qualification test where new labelers annotate a small set with known "correct" answers before working on real data.
Maintaining Engagement and Motivation: Labeling can be repetitive work. Maintain quality by:
- Providing regular, specific feedback (not just "good job" but "your bounding boxes on occluded objects have improved 15% this week")
- Creating reasonable quotas that don't encourage rushing
- Implementing gamification elements carefully (leaderboards for accuracy, not just speed)
- Rotating between different labeling tasks to reduce monotony
Monitoring Performance Metrics: Track key indicators for each labeler and the overall team:
- Accuracy compared to expert reviewers or consensus answers
- Consistency over time and across similar items
- Productivity with quality-adjusted measures (not just raw speed)
- Agreement with other labelers on the same items
Creating Escalation Pathways: Labelers will encounter ambiguous cases not covered in guidelines. Establish clear channels for getting clarification—dedicated chat channels, regular office hours with experts, or structured ticket systems. Document these decisions and incorporate them into updated guidelines.
Special Considerations for Different Data Types
While the principles of good labeling apply universally, different data types present unique challenges:
Image and Video Data:
- Handle varying resolutions and aspect ratios: Standardize or establish rules for different formats
- Address occlusion creatively: Use "amodal" labeling (labeling full objects including hidden parts) when needed
- Consider temporal consistency in video: Objects should have consistent labels across frames
- Manage large file sizes: Use efficient streaming and compression to avoid tool lag
Text and Natural Language Data:
- Define labeling units precisely: What constitutes a "token" or segment for your purpose?
- Handle ambiguity in language
- Address overlapping spans: How to label nested entities (e.g., "Bank of America" contains "America")
Audio and Speech Data:
- Account for background noise and quality variations: Define minimum quality thresholds
- Handle multiple speakers: Speaker diarization (who spoke when) adds complexity
- Transcribe non-standard speech: Rules for accents, dialects, speech impediments
- Label para-linguistic features: Emotion, tone, stress patterns if relevant
Sensor and Time-Series Data:
- Define meaningful segmentation: What constitutes an "event" or pattern in continuous data?
- Handle sensor fusion: Aligning labels across multiple synchronized data streams
- Address missing or corrupt data: Rules for interpolation or exclusion
Mitigating Bias in Labeled Datasets
Bias in training data leads to biased models that can perpetuate or amplify social inequalities. Proactively addressing bias isn't just ethical—it creates more robust, generalizable AI systems.
Understand Sources of Bias: Bias can enter at multiple points:
- Selection bias: Your data doesn't represent the full population or usage scenarios
- Labeler bias: Labelers' backgrounds and perspectives influence their judgments
- Measurement bias: Your labeling framework systematically misrepresents certain cases
- Aggregation bias: Combining data from different sources with different characteristics
Implement Bias-Reduction Strategies:
- Diversify your labeler pool: Ensure representation across relevant demographic dimensions
- Conduct bias audits: Statistically analyze labels across different subgroups in your data
- Use adversarial validation: Train models to detect which subgroup data comes from—if they succeed, bias exists
- Implement consensus labeling with diverse labelers: Multiple perspectives surface and balance individual biases
Document Bias-Related Decisions: Maintain records of:
- Demographics of your labeler team (aggregated to protect privacy)
- Known limitations in your dataset coverage
- Choices made when handling sensitive attributes
- Results of bias audits and mitigation efforts
Cost Management and Efficiency Optimization
Data labeling can become expensive quickly, but strategic approaches can optimize your budget:
Implement Active Learning Strategies: Instead of labeling everything, use algorithms to identify which examples would be most informative to label next. This can reduce labeling volume by 50-80% while maintaining model performance. Start with a diverse initial set, train a model, identify where it's most uncertain, label those examples, retrain, and repeat.
Use Labeling Tiers Appropriately: Not all data needs the same labeling rigor. Consider a multi-tier approach:
- Tier 1 (High precision): Mission-critical examples, edge cases - use expert labelers with consensus and rigorous QA
- Tier 2 (Standard): Typical examples - use trained labelers with sample-based QA
- Tier 3 (Low cost): Easy, unambiguous examples - use basic labeling with minimal QA
Leverage Transfer Learning and Synthetic Data: Sometimes you can reduce labeling needs by:
- Using pre-trained models and fine-tuning them on your specific data (requires less labeled data)
- Generating synthetic examples to augment your real data (especially for rare cases)
- Applying labels from similar domains or tasks with adaptation
Calculate Total Cost of Ownership: Look beyond per-label costs to include:
- Guideline development and maintenance
- Training and management overhead
- Tool licensing and infrastructure
- Quality assurance processes
- Dataset maintenance and versioning
Common Pitfalls and How to Avoid Them
Learning from others' mistakes is cheaper than making your own. Here are frequent labeling problems and preventive measures:
Pitfall 1: Inconsistent Guidelines Symptoms: Different labelers interpreting the same case differently, frequent questions about edge cases, model learning inconsistent patterns. Prevention: Invest more time in guideline development, conduct thorough pilot labeling, create visual examples for every edge case, maintain a living FAQ.
Pitfall 2: Labeler Fatigue and Quality Drift Symptoms: Quality declining over time, increasing variability in labeling speed, labelers missing obvious errors. Prevention: Implement reasonable quotas, rotate between task types, provide regular breaks, monitor quality metrics for each labeler over time, use gold standard questions periodically to check attention.
Pitfall 3: Inadequate Quality Assurance Symptoms: Errors discovered only during model evaluation, embarrassing failures in production, need for complete relabeling. Prevention: Build QA into your process from the start, use multiple review stages, calculate and track agreement metrics, maintain a small set of gold standard examples for continuous validation.
Pitfall 4: Poor Dataset Documentation Symptoms: Cannot reproduce results months later, confusion about which model used which data version, inability to trace error sources. Prevention: Implement rigorous version control from day one, document all labeling decisions and guideline versions, maintain change logs, link dataset versions to model performance.
Measuring and Tracking Labeling Quality
You can't improve what you don't measure. Implement these quantitative and qualitative metrics:
Accuracy Metrics:
- Inter-labeler agreement: Cohen's Kappa, Fleiss' Kappa, or Intraclass Correlation Coefficient
- Comparison to gold standard: Precision, recall, F1-score against expert-labeled examples
- Error rate by category: Which labels have the highest disagreement or error rates?
Consistency Metrics:
- Intra-labeler consistency: Same labeler's agreement on duplicate or similar examples
- Temporal consistency: How metrics change over labeling periods
- Cross-dataset consistency: Performance on similar items across different data batches
Process Metrics:
- Labeling throughput: Items labeled per hour (quality-adjusted)
- Review cycle time: Time from labeling to QA completion
- Error detection rate: What percentage of errors are caught in each QA stage?
- Cost per quality-labeled example: Total cost divided by verified correct labels
Regularly review these metrics in dedicated sessions with your labeling team. Celebrate improvements, diagnose declines, and adjust processes based on data—practicing what you preach about data-driven decision making.
Ethical Considerations in Data Labeling
Data labeling involves human judgment about potentially sensitive content, requiring thoughtful ethical practices:
Labeler Well-being: Some labeling tasks involve disturbing, offensive, or traumatic content (content moderation, accident images, medical pathologies). Implement:
- Content warnings before potentially disturbing tasks
- Regular mental health breaks and access to support resources
- Option to opt out of specific content types without penalty
- Rotation away from high-stress labeling tasks
Privacy Protection: Labelers may see sensitive personal information. Establish:
- Clear confidentiality agreements and training
- Data anonymization where possible (blurring faces, removing identifiers)
- Secure data handling and access controls
- Audit trails of who accessed what data
Fair Compensation: Ensure labelers receive fair pay for their work, especially on crowdsourcing platforms where wage depression is common. Calculate living-wage equivalents for your regions and task complexities.
Transparency and Consent: When applicable, inform data subjects that their data may be viewed by labelers for AI training purposes. Where possible, obtain explicit consent, especially for sensitive data.
For broader ethical frameworks, our guide to ethical AI principles provides additional context on responsible AI development.
The Future of Data Labeling
Data labeling continues to evolve with several emerging trends:
AI-Assisted Labeling Becomes Standard: As foundation models improve, they'll provide increasingly accurate label suggestions that humans verify rather than create from scratch. This shifts the labeler role from "creator" to "validator and curator," potentially increasing both speed and quality.
Greater Emphasis on Dataset Documentation: Inspired by "model cards" and "datasheets for datasets," comprehensive documentation of labeling processes, decisions, and limitations will become expected practice for reputable AI development.
Specialized Labeling for Emerging Modalities: New data types like 3D point clouds, multispectral imagery, and biometric signals require novel labeling approaches and tools.
Integration with MLOps Pipelines: Labeling tools will increasingly integrate directly with continuous training pipelines, automatically triggering new labeling based on model performance metrics or production data drift.
Focus on Ethical Supply Chains: Greater scrutiny on labeling workforce conditions will drive transparency about how training data is produced, similar to ethical sourcing in physical goods.
Getting Started: A Practical Roadmap
If you're beginning your first labeling project, follow this step-by-step approach:
Week 1-2: Foundation
- Define your specific ML objective with measurable success criteria
- Collect a small, diverse sample of raw data (100-200 examples)
- Develop initial labeling guidelines with at least 3 examples per label
- Select and set up a labeling tool (start simple—spreadsheets work for tiny projects)
Week 3-4: Pilot and Refine
- Label your small dataset yourself to understand the challenges
- Have 1-2 others label the same set independently
- Compare results, identify disagreements, and refine guidelines
- Formalize your QA process (who reviews, what sample size, what metrics)
Month 2: Scale with Control
- Begin labeling your full dataset with your refined guidelines
- Implement your QA process from the start
- Track basic quality metrics weekly
- Hold regular clarification sessions to address emerging questions
Ongoing: Iterate and Improve
- As labels accumulate, train simple models to identify problematic patterns
- Continuously update guidelines based on edge cases
- Document everything—you'll thank yourself later
- Share learnings with your team and community
Remember that data labeling is both science and craft. The technical frameworks ensure consistency and scalability, while the human elements—judgment, communication, and attention to detail—determine ultimate quality. By investing in thoughtful labeling processes, you're not just preparing data for today's model; you're building a foundation for all the AI innovations that will follow.
Further Reading
- Synthetic Data for Training: When and How to Use It - Learn how generated data can complement your real labeled datasets
- Active Learning: Reduce Label Costs While Improving Models - Advanced techniques for prioritizing which data to label
- Ethical AI Explained: Why Fairness and Bias Matter - Deep dive into identifying and mitigating bias in AI systems
Visuals Produced by AI
Share
What's Your Reaction?
 Like
1875
Like
1875
 Dislike
12
Dislike
12
 Love
345
Love
345
 Funny
28
Funny
28
 Angry
8
Angry
8
 Sad
5
Sad
5
 Wow
210
Wow
210


Implementing the weekly metrics review with our labeling team has improved both quality and morale. Labelers appreciate seeing their progress quantitatively rather than just subjective feedback. The key was making it collaborative, not punitive.
I'd love to see a follow-up article on handling ambiguous cases specifically. We spend 70% of our labeling time on the 10% of cases that don't fit clean categories. More strategies for these edge cases would be incredibly valuable.
The future trends section resonates – we're already seeing AI-assisted labeling cut our time by 60% for routine cases. But human review is still essential for quality. The shift from creator to validator role is happening faster than expected.
Cultural context matters more than I realized. We're labeling social media content for sentiment across different regions. What's positive in one culture can be neutral or negative in another. Having labelers from target regions is not optional – it's essential for accuracy.
Working on medical imaging labels. The consensus approach with multiple specialists (3 radiologists labeling independently) is essential but expensive. Your suggestion about using it only for edge cases after initial screening helped us optimize costs.
The cost management section needs more emphasis on hidden costs. We budgeted for per-label costs but overlooked guideline development, QA time, and management overhead. Ended up 30% over budget in our first project. Learning the hard way!