How to Build a Simple Voice Assistant Using Public APIs
This comprehensive guide walks you through building your own voice assistant from scratch using free public APIs. Learn how voice assistants work behind the scenes, compare different API providers like Google Speech-to-Text, OpenAI Whisper, and Amazon Polly, and follow step-by-step tutorials for both coding and no-code approaches. We'll cover everything from setting up your development environment to deploying your assistant, with practical examples you can try today. Perfect for beginners, this guide demystifies voice AI technology while giving you hands-on experience with real APIs.
How to Build a Simple Voice Assistant Using Public APIs
Have you ever wondered how voice assistants like Siri, Alexa, and Google Assistant actually work? What if you could build your own customized voice assistant that understands your commands and responds intelligently? In this comprehensive guide, we'll demystify voice AI technology and walk you through creating your own voice assistant using free public APIs—no expensive equipment or advanced degrees required.
Building a voice assistant might sound like a complex task reserved for tech giants, but thanks to the availability of powerful public APIs, anyone with basic computer skills can create their own. Whether you want a personal assistant to manage your schedule, control smart home devices, or just experiment with voice technology, this guide will give you the practical knowledge to make it happen.
Understanding How Voice Assistants Work
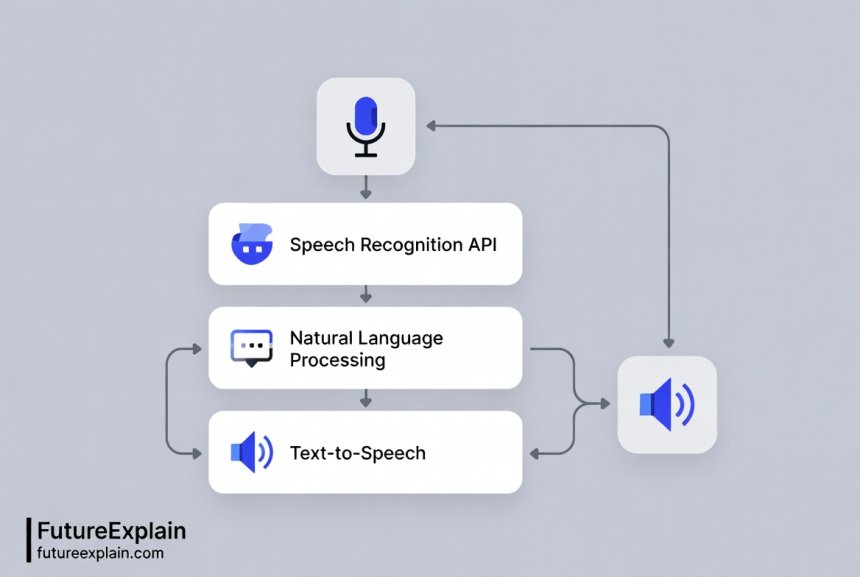
Before we dive into building, let's understand the fundamental components of any voice assistant system. Every voice assistant, from the simplest to the most complex, follows a similar three-step process:
- Speech Recognition: Converting spoken words into text
- Natural Language Processing: Understanding the meaning and intent behind the words
- Response Generation: Creating appropriate responses and converting them back to speech
Each of these components can be handled by different APIs, which means you can mix and match services to create your ideal assistant. For example, you might use Google's Speech-to-Text API for recognition, OpenAI's API for understanding, and Amazon's Polly for speech synthesis.
The beauty of using public APIs is that you don't need to build these complex AI models from scratch. Companies like Google, Amazon, Microsoft, and OpenAI have spent years developing these technologies and now offer them as services you can access with just a few lines of code.
Choosing the Right APIs for Your Voice Assistant
Different API providers offer varying features, pricing models, and capabilities. Here's a comparison of the most popular options for each component:
Speech Recognition APIs
- Google Speech-to-Text: Excellent accuracy, supports 125+ languages, offers real-time streaming. Free tier: 60 minutes per month.
- OpenAI Whisper API: Great for transcription, handles different accents well, open-source model available. Pay-as-you-go pricing.
- Microsoft Azure Speech Services: Strong enterprise features, custom speech models available. Free tier: 5 hours audio per month.
- AssemblyAI: Specialized for transcription, good accuracy, straightforward API. Free tier available.
Natural Language Processing APIs
- OpenAI GPT API: Excellent for conversational AI, understands context well. Most popular choice for intelligent responses.
- Google Dialogflow: Designed specifically for conversational interfaces, visual interface available. Free tier generous.
- Microsoft LUIS: Good intent recognition, integrates well with other Azure services.
- IBM Watson Assistant: Enterprise-focused, strong industry solutions.
Text-to-Speech APIs
- Amazon Polly: High-quality voices, neural TTS available, extensive language support. Free tier: 5 million characters per month.
- Google Text-to-Speech: Natural sounding voices, WaveNet technology. Free tier: 1 million characters per month.
- Microsoft Azure Neural TTS: Very natural voices, custom voice options available.
- ElevenLabs: Cutting-edge voice cloning and ultra-realistic speech. Limited free tier.
For our tutorial, we'll use a combination that maximizes the free tiers: Google Speech-to-Text for recognition, OpenAI for processing (using their free credit for new users), and Amazon Polly for speech synthesis. This gives us a robust system without immediate costs.
Setting Up Your Development Environment
Before writing any code, you need to set up your working environment. We'll use Python because it has excellent library support for voice applications and is beginner-friendly.
Step 1: Install Python and Required Libraries
First, ensure you have Python 3.8 or newer installed. You can download it from the official Python website. Then install these essential libraries:
speech_recognition- For capturing microphone inputpyttsx3- For basic text-to-speech (offline option)pyaudio- For audio input/output (might need separate installation)openai- For accessing OpenAI's APIboto3- For Amazon Web Services including Pollygoogle-cloud-speech- For Google Speech API
You can install most of these with pip: pip install speechrecognition pyttsx3 openai boto3 google-cloud-speech
Step 2: Get API Keys
You'll need to sign up for accounts and get API keys from:
- Google Cloud: Create a project, enable Speech-to-Text API, create credentials
- OpenAI: Sign up, get API key from dashboard (new users get free credits)
- Amazon AWS: Create account, create IAM user with Polly access, get access keys
Store these keys securely—never commit them to public code repositories. We'll use environment variables to keep them safe.
Step 3: Set Up Authentication
Create a .env file in your project directory with:
GOOGLE_APPLICATION_CREDENTIALS=path/to/your/google-credentials.json
  OPENAI_API_KEY=your-openai-key-here
  AWS_ACCESS_KEY_ID=your-aws-access-key
  AWS_SECRET_ACCESS_KEY=your-aws-secret-key
  AWS_DEFAULT_REGION=us-east-1
Then install python-dotenv to load these: pip install python-dotenv
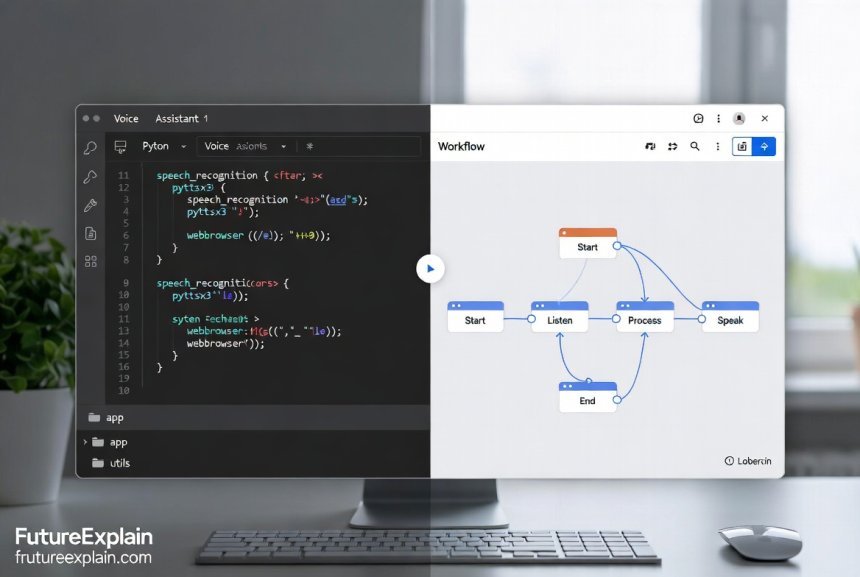
Building Your First Voice Assistant: Step-by-Step Code
Now let's build a basic voice assistant that can understand simple commands and respond. We'll start with a local version that doesn't require internet for speech synthesis, then upgrade to use cloud APIs.
Basic Local Voice Assistant
Here's a complete working example that runs entirely on your computer:
import speech_recognition as sr
  import pyttsx3
  import datetime

  class SimpleVoiceAssistant:
def __init__(self):
self.recognizer = sr.Recognizer()
  self.engine = pyttsx3.init()
  self.engine.setProperty('rate', 150)  # Speed of speech

  def listen(self):
with sr.Microphone() as source:
print("Listening...")
  audio = self.recognizer.listen(source)

  try:
  text = self.recognizer.recognize_google(audio)
  print(f"You said: {text}")
  return text.lower()
  except sr.UnknownValueError:
print("Sorry, I didn't understand that.")
  return ""
  except sr.RequestError:
print("Could not request results from Google Speech Recognition")
  return ""

  def speak(self, text):
self.engine.say(text)
  self.engine.runAndWait()

  def process_command(self, command):
if not command:
return

  if "hello" in command or "hi" in command:
  self.speak("Hello! How can I help you?")
  elif "time" in command:
  current_time = datetime.datetime.now().strftime("%I:%M %p")
  self.speak(f"The current time is {current_time}")
  elif "date" in command:
  current_date = datetime.datetime.now().strftime("%B %d, %Y")
  self.speak(f"Today's date is {current_date}")
  elif "your name" in command:
  self.speak("I am your personal voice assistant")
  elif "stop" in command or "exit" in command:
  self.speak("Goodbye!")
  return False
  else:
  self.speak("I'm sorry, I don't understand that command yet.")

  return True

  def run(self):
self.speak("Voice assistant activated. How can I help you?")
  running = True

  while running:
command = self.listen()
  if command:
running = self.process_command(command)

  if __name__ == "__main__":
  assistant = SimpleVoiceAssistant()
  assistant.run()
This basic assistant demonstrates the core loop: listen, process, speak. It uses Google's free speech recognition (which requires internet) and local text-to-speech.
Enhanced Assistant with Cloud APIs
Now let's upgrade to use cloud APIs for better accuracy and more natural responses:
import os
  import speech_recognition as sr
  from google.cloud import speech
  import openai
  import boto3
  from dotenv import load_dotenv

  load_dotenv()

  class CloudVoiceAssistant:
def __init__(self):
  # Initialize all API clients
  self.openai_api_key = os.getenv("OPENAI_API_KEY")
  openai.api_key = self.openai_api_key

  # AWS Polly client
  self.polly_client = boto3.client(
  'polly',
  aws_access_key_id=os.getenv("AWS_ACCESS_KEY_ID"),
  aws_secret_access_key=os.getenv("AWS_SECRET_ACCESS_KEY"),
  region_name=os.getenv("AWS_DEFAULT_REGION")
  )

  # Google Speech client
  self.speech_client = speech.SpeechClient()

  # Local recognizer as fallback
  self.local_recognizer = sr.Recognizer()

  def listen_with_google(self):
  """Use Google Cloud Speech-to-Text for better accuracy"""
  with sr.Microphone() as source:
print("Listening with Google Cloud...")
  audio = self.local_recognizer.listen(source, timeout=5, phrase_time_limit=10)

  # Convert audio to format Google API expects
  audio_content = audio.get_wav_data()

  audio = speech.RecognitionAudio(content=audio_content)
  config = speech.RecognitionConfig(
  encoding=speech.RecognitionConfig.AudioEncoding.LINEAR16,
  sample_rate_hertz=16000,
  language_code="en-US",
  enable_automatic_punctuation=True,
  )

  try:
  response = self.speech_client.recognize(config=config, audio=audio)

  if response.results:
text = response.results[0].alternatives[0].transcript
print(f"Google understood: {text}")
return text
else:
print("No speech detected")
return ""

except Exception as e:
print(f"Google Speech error: {e}")
# Fallback to local recognition
return self.listen_locally()

def listen_locally(self):
"""Fallback to local speech recognition"""
with sr.Microphone() as source:
print("Listening locally...")
audio = self.local_recognizer.listen(source)

try:
text = self.local_recognizer.recognize_google(audio)
print(f"Local recognition: {text}")
return text
except:
return ""

def get_intelligent_response(self, user_input):
"""Use OpenAI to generate intelligent responses"""
try:
response = openai.ChatCompletion.create(
model="gpt-3.5-turbo",
messages=[
{"role": "system", "content": "You are a helpful voice assistant. Keep responses concise and natural for speech."},
{"role": "user", "content": user_input}
],
max_tokens=150,
temperature=0.7
)

return response.choices[0].message.content

except Exception as e:
print(f"OpenAI error: {e}")
return "I apologize, but I'm having trouble processing your request right now."

def speak_with_polly(self, text):
"""Use Amazon Polly for high-quality speech synthesis"""
try:
response = self.polly_client.synthesize_speech(
Text=text,
OutputFormat='mp3',
VoiceId='Joanna'  # You can change this to other voices
)

# Save to temporary file and play
with open('temp_speech.mp3', 'wb') as file:
file.write(response['AudioStream'].read())

# Play the audio (you might need pygame or similar)
os.system("mpg321 temp_speech.mp3" if os.name != 'nt' else "start temp_speech.mp3")
os.remove('temp_speech.mp3')

except Exception as e:
print(f"Polly error: {e}")
# Fallback to local TTS
self.speak_locally(text)

def speak_locally(self, text):
"""Fallback local text-to-speech"""
import pyttsx3
engine = pyttsx3.init()
engine.say(text)
engine.runAndWait()

def run_conversation(self):
"""Main conversation loop"""
print("Cloud Voice Assistant Ready. Say 'stop' to exit.")
self.speak_with_polly("Hello! I am your cloud-powered voice assistant. How can I help you today?")

while True:
# Listen for command
user_input = self.listen_with_google()

if not user_input:
continue

# Check for exit command
if "stop" in user_input.lower() or "exit" in user_input.lower():
self.speak_with_polly("Goodbye! Have a great day.")
break

# Get intelligent response
response = self.get_intelligent_response(user_input)
print(f"Assistant: {response}")

# Speak the response
self.speak_with_polly(response)

if __name__ == "__main__":
assistant = CloudVoiceAssistant()
assistant.run_conversation()
This enhanced version demonstrates professional API integration with proper error handling and fallbacks. It's more robust and produces higher quality results.
No-Code Alternatives for Building Voice Assistants
Not comfortable with coding? Several platforms allow you to build voice assistants visually:
1. Voiceflow
Voiceflow is a visual design platform for creating voice and chat applications. You can:
- Design conversations with drag-and-drop blocks
- Connect to various APIs without coding
- Test with voice simulation
- Deploy to Alexa, Google Assistant, or as a web app
The free tier allows for prototyping and testing basic assistants.
2. Botpress
While primarily for chatbots, Botpress has voice integration capabilities:
- Visual flow builder
- Native voice channel support
- Connect to telephony systems
- Open-source option available
3. Jovo Framework
Jovo is an open-source framework that provides:
- Visual prototype builder (Jovo CLI)
- Multi-platform deployment (Alexa, Google Assistant, etc.)
- Local development server
- Extensive plugin system
4. Microsoft Power Virtual Agents
Part of the Microsoft Power Platform, this offers:
- Complete no-code environment
- Natural language understanding built-in
- Easy integration with other Microsoft services
- Voice channel through Azure Direct Line Speech
These tools are excellent for business use cases or when you need to deploy assistants quickly without extensive programming knowledge.
Advanced Features to Enhance Your Voice Assistant
Once you have the basic assistant working, you can add these advanced features:
Wake Word Detection
Instead of constantly listening, add wake word detection so your assistant only activates when you say a specific phrase like "Hey Assistant":
# Using Porcupine wake word engine (free for personal use)
import pvporcupine
import pyaudio
import struct

class WakeWordDetector:
def __init__(self, access_key, wake_word="jarvis"):
self.porcupine = pvporcupine.create(
access_key=access_key,
keywords=[wake_word]
)
self.audio = pyaudio.PyAudio()
self.stream = self.audio.open(
rate=self.porcupine.sample_rate,
channels=1,
format=pyaudio.paInt16,
input=True,
frames_per_buffer=self.porcupine.frame_length
)

def listen_for_wake_word(self):
pcm = self.stream.read(self.porcupine.frame_length)
pcm = struct.unpack_from("h" * self.porcupine.frame_length, pcm)

keyword_index = self.porcupine.process(pcm)
return keyword_index >= 0
Context Awareness
Make your assistant remember previous conversations:
class ContextAwareAssistant:
def __init__(self):
self.conversation_history = []
self.max_history = 10  # Keep last 10 exchanges

def add_to_history(self, user_input, assistant_response):
self.conversation_history.append({
"user": user_input,
"assistant": assistant_response
})

# Keep only recent history
if len(self.conversation_history) > self.max_history:
self.conversation_history = self.conversation_history[-self.max_history:]

def get_context_prompt(self):
"""Create a prompt with conversation history"""
context_lines = []
for exchange in self.conversation_history[-5:]:  # Last 5 exchanges
context_lines.append(f"User: {exchange['user']}")
context_lines.append(f"Assistant: {exchange['assistant']}")

return "n".join(context_lines)
Skill System
Create a modular skill system for different types of commands:
class SkillSystem:
def __init__(self):
self.skills = {}

def register_skill(self, name, skill_function):
self.skills[name] = skill_function

def execute_skill(self, skill_name, *args, **kwargs):
if skill_name in self.skills:
return self.skills[skill_name](*args, **kwargs)
return None

# Example skill
def weather_skill(location):
# Call weather API
return f"The weather in {location} is sunny and 72 degrees."

assistant_skills = SkillSystem()
assistant_skills.register_skill("weather", weather_skill)
Cost Optimization and Free Tier Strategies
Public APIs can become expensive if not managed properly. Here's how to optimize costs:
1. Implement Caching
Cache common responses to avoid unnecessary API calls:
import json
import hashlib
from datetime import datetime, timedelta

class ResponseCache:
def __init__(self, cache_file="assistant_cache.json"):
self.cache_file = cache_file
self.cache = self.load_cache()

def load_cache(self):
try:
with open(self.cache_file, 'r') as f:
return json.load(f)
except:
return {}

def save_cache(self):
with open(self.cache_file, 'w') as f:
json.dump(self.cache, f)

def get_cache_key(self, query):
return hashlib.md5(query.encode()).hexdigest()

def get(self, query):
key = self.get_cache_key(query)
if key in self.cache:
cached = self.cache[key]
# Check if cache is still valid (24 hours)
cache_time = datetime.fromisoformat(cached['timestamp'])
if datetime.now() - cache_time < timedelta(hours=24):
return cached['response']
return None

def set(self, query, response):
key = self.get_cache_key(query)
self.cache[key] = {
'response': response,
'timestamp': datetime.now().isoformat()
}
self.save_cache()
2. Use Local Processing When Possible
Implement fallbacks to local processing for simple queries:
def smart_processing(self, user_input):
"""Choose between local and cloud processing based on complexity"""
simple_commands = ['time', 'date', 'calculator', 'simple math']

# Check if it's a simple command
for command in simple_commands:
if command in user_input.lower():
return self.process_locally(user_input)

# Otherwise use cloud API
return self.process_with_openai(user_input)
3. Monitor API Usage
Track your usage to avoid surprises:
class UsageTracker:
def __init__(self):
self.usage = {
'speech_to_text': 0,
'text_to_speech': 0,
'openai_tokens': 0
}

def track_usage(self, service, amount):
if service in self.usage:
self.usage[service] += amount

# Check limits
self.check_limits()

def check_limits(self):
free_limits = {
'speech_to_text': 60,  # minutes
'text_to_speech': 5000000,  # characters
'openai_tokens': 100000  # tokens
}

for service, limit in free_limits.items():
if self.usage[service] > limit * 0.8:  # 80% of limit
print(f"Warning: {service} usage at {self.usage[service]}/{limit}")
Deployment Options for Your Voice Assistant
Once built, you have several deployment options:
1. Local Computer
Run it directly on your computer for personal use. Pros: Complete control, no hosting costs. Cons: Only works when your computer is on.
2. Raspberry Pi
Deploy to a Raspberry Pi for a dedicated device:
- Low cost (~$35-100)
- Low power consumption
- Always-on capability
- Can connect to speakers/microphones
3. Cloud Hosting
Host on cloud services for accessibility from anywhere:
- AWS Lambda: Serverless, pay-per-use, scales automatically
- Google Cloud Run: Container-based, auto-scaling
- PythonAnywhere: Beginner-friendly, free tier available
- Heroku: Easy deployment, free dyno available
4. Mobile App
Convert to a mobile app using frameworks like:
- Kivy: Python framework for mobile apps
- React Native: JavaScript framework with Python backend
- Flutter: Dart framework with Python API calls
Troubleshooting Common Issues
Here are solutions to common problems when building voice assistants:
Microphone Not Working
- Check microphone permissions in your operating system
- Try a different microphone
- Use
pyaudioto list available devices
Poor Speech Recognition Accuracy
- Add noise cancellation with
recognizer.adjust_for_ambient_noise() - Use a better quality microphone
- Try different speech recognition APIs (some work better with certain accents)
- Implement voice activity detection to only process when someone is speaking
High Latency
- Implement local processing for common commands
- Use faster APIs (Google Speech is generally faster than Whisper)
- Implement streaming recognition for real-time processing
- Cache frequently used responses
API Rate Limits
- Implement exponential backoff for retries
- Use multiple API keys if allowed
- Implement usage tracking and alerts
- Consider paid tiers for higher limits
Ethical Considerations and Privacy
When building voice assistants, consider these important ethical aspects:
Data Privacy
- Inform users when you're recording
- Implement automatic deletion of recordings after processing
- Use local processing when possible to avoid sending sensitive data to cloud
- Encrypt stored audio data
Transparency
- Clearly indicate when the assistant is listening
- Provide visual feedback for processing
- Allow users to review what was recorded
Bias Mitigation
- Test with diverse speech patterns and accents
- Implement fallback mechanisms for misunderstood speech
- Regularly update your models/APIs to benefit from bias reduction improvements
Accessibility
- Support multiple languages if possible
- Provide alternative input methods for users who cannot speak
- Ensure clear audio output for hearing-impaired users
Future Enhancements and Learning Path
Once you've mastered the basics, here are directions for further learning:
1. Custom Wake Word Training
Train your own wake word detector using tools like:
- Snowboy (now discontinued but archives available)
- Porcupine with custom keyword training
- TensorFlow for custom audio classification
2. Multimodal Integration
Combine voice with other inputs:
- Add camera input for visual context
- Integrate with smart home device controls
- Combine with gesture recognition
3. Specialized Domains
Create assistants for specific use cases:
- Medical assistant (with proper disclaimers)
- Educational tutor for specific subjects
- Business assistant for scheduling and emails
- Accessibility assistant for people with disabilities
4. Advanced NLP Features
Implement more sophisticated language understanding:
- Sentiment analysis to detect user emotion
- Entity recognition for extracting names, dates, locations
- Contextual understanding across multiple turns
- Personalization based on user history
Conclusion
Building your own voice assistant with public APIs is an achievable project that teaches you about speech recognition, natural language processing, and API integration. Whether you choose the coding approach with Python or opt for no-code platforms, you now have the knowledge to create a functional assistant that can understand and respond to voice commands.
Remember to start simple, test frequently, and iterate based on what works. Voice technology is rapidly evolving, and the skills you learn building assistants today will be valuable as voice interfaces become increasingly common in our daily lives.
The key takeaways from this guide are:
- Voice assistants consist of speech recognition, natural language processing, and speech synthesis components
- Public APIs make advanced AI capabilities accessible without building models from scratch
- Both coding (Python) and no-code approaches are viable depending on your needs
- Cost management and privacy considerations are crucial for responsible development
- Continuous learning and adaptation are essential as technology evolves
Now that you have the foundation, why not start building? Begin with the simple local assistant, then gradually add cloud APIs and advanced features. The journey of creating your own intelligent assistant is not only educational but also incredibly rewarding.
Further Reading
If you enjoyed this guide, you might also like:
- Building a Simple AI Chatbot Without Coding - Learn to create text-based assistants
- Multimodal AI: Combining Text, Image, Audio, and Video - Explore multi-sensory AI systems
- How to Implement Continuous Learning in Production - Make your assistant improve over time
Share
What's Your Reaction?
 Like
2140
Like
2140
 Dislike
15
Dislike
15
 Love
420
Love
420
 Funny
85
Funny
85
 Angry
8
Angry
8
 Sad
3
Sad
3
 Wow
310
Wow
310


Thank you for including ethical considerations. Too many AI tutorials ignore the responsibility that comes with building these systems.
Built a voice assistant for my e-commerce store. Customers can ask about products. The no-code Voiceflow option was perfect for quick deployment.
As someone with no coding background, I appreciate the clear explanations of what each part does. Not just copy-paste code but understanding.
The future enhancements section has given me so many project ideas! Starting with sentiment analysis - want my assistant to detect when I'm stressed.
Multilingual support would be great. Any plans to cover building assistants that understand multiple languages?
Yes! Many of the APIs mentioned support multiple languages. Google Speech supports 125+ languages. For a multilingual assistant, you'd need: 1) Language detection, 2) Separate processing pipelines per language, 3) Translation API for cross-language understanding. We're planning a detailed guide on this topic.
I combined this with the chatbot tutorial from last month. Now have a system that works via both text and voice. Amazing integration potential!