How to Build an Autonomous Agent (Beginner’s Guide)
This guide provides a clear, practical path for beginners to build their first autonomous AI agent. We start by demystifying what AI agents are and how they differ from simple chatbots, using the analogy of a goal-oriented assistant. You'll learn the core components of an agent: planning, memory, tools, and action. The guide then walks you through choosing the right development approach, from no-code platforms for instant results to low-code frameworks for more control. A central, hands-on project demonstrates building a 'Research Assistant' agent that can autonomously browse the web, summarize articles, and save notes. We cover essential concepts like prompt engineering for agents, managing costs, testing, and deployment, while consistently emphasizing safety, oversight, and starting simple. The goal is to equip you with foundational knowledge and the confidence to start creating useful automated helpers.
How to Build an Autonomous Agent: A Beginner’s Guide
The concept of an AI agent that can act autonomously—planning, using tools, and completing tasks on your behalf—sounds like science fiction. Yet, this technology is rapidly becoming accessible. A 2025 McKinsey survey found that 62% of organizations are already experimenting with AI agents, moving beyond simple chatbots to systems that can execute multi-step workflows[citation:8]. You don't need to be a large corporation to start. This guide is designed for beginners, students, and small business owners who want to move from using AI to building with it. We will demystify autonomous agents, break down their components in simple terms, and guide you through building your first one using practical, approachable methods.
What is an Autonomous AI Agent, Really?
Before we start building, let's clarify what we're creating. Think of a standard AI chatbot like ChatGPT. You ask a question, it generates an answer. It's reactive. An autonomous agent is proactive and goal-oriented. You give it a high-level objective—like "Research the latest trends in solar energy and summarize the top three"—and the agent figures out the steps needed: planning a web search, reading articles, comparing information, and drafting a summary.
As Microsoft describes, these agents are beginning to transform business processes, handling complex assignments by combining memory, reasoning, and the ability to use tools (like a web browser or a calculator)[citation:1]. For a beginner, your first agent might be a personal assistant that organizes your files, a social media monitor that fetches and summarizes news, or a customer support triage bot. The key is that it moves beyond conversation into action.
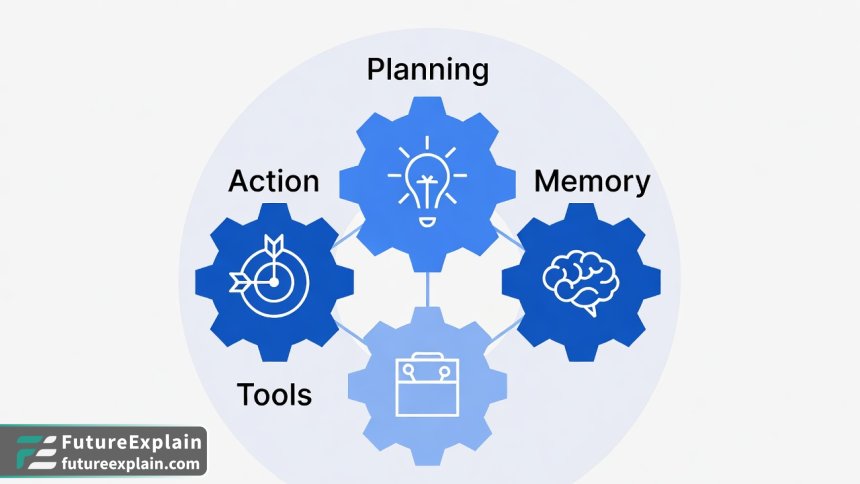
The Four Building Blocks of Every Agent
Every autonomous agent, from a simple script to a sophisticated corporate tool, is built on four core components. Understanding these will help you design and troubleshoot your own creations.
1. The Planner (The "Brain")
The planner is the agent's reasoning engine. Given a goal, it breaks it down into a sequence of manageable steps. For a complex goal like "Plan a week-long business trip to Berlin," the planner might decide the steps are: 1) Check calendar for availability, 2) Search for flights within budget, 3) Find hotels near the conference venue, 4) Compile a daily itinerary. Advanced agents use techniques like "chain-of-thought" reasoning to think through these steps logically before acting[citation:4]. For beginners, the planner is often the large language model (LLM) itself, prompted to output a step-by-step plan.
2. The Memory (The "Notebook")
An agent without memory is like having a conversation with someone who instantly forgets everything you've said. Memory allows the agent to retain information across its actions. There are two main types:
- Short-term Memory: This is the context of the current task. It remembers what step it's on, what the previous step's result was, and what its ultimate goal is.
- Long-term Memory: This allows the agent to learn from past episodes. For example, if your research agent found that a particular website often has poor-quality information, it could store that fact and prioritize other sources in the future. This is often implemented using a vector database to store and recall relevant past experiences[citation:6].
3. The Tools (The "Hands")
This is what separates an agent from a mere planner. Tools are functions the agent can call to interact with the world. A simple agent's toolkit might include:
- A web search tool (using an API like SerpAPI or Brave Search).
- A calculator.
- A code executor (to run Python snippets).
- A file read/write tool (to save its work).
The agent's planner decides which tool to use and with what parameters. For instance, to get the current weather, it would call the "web_search" tool with the query "current weather New York."
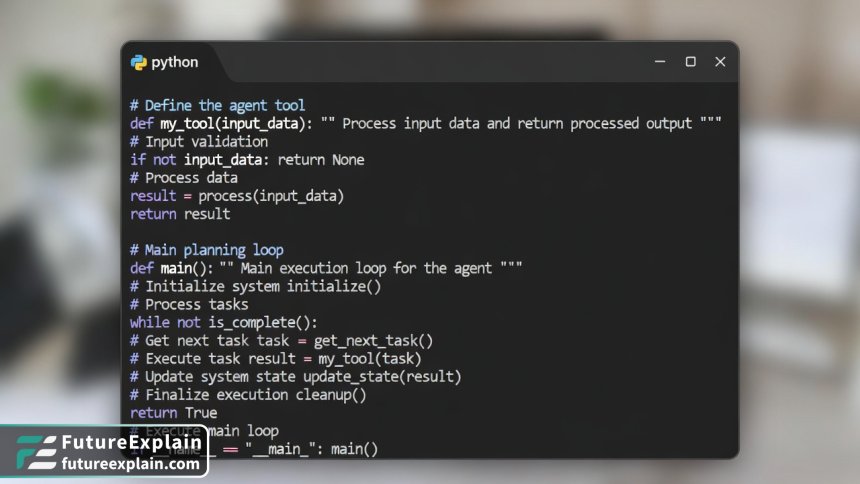
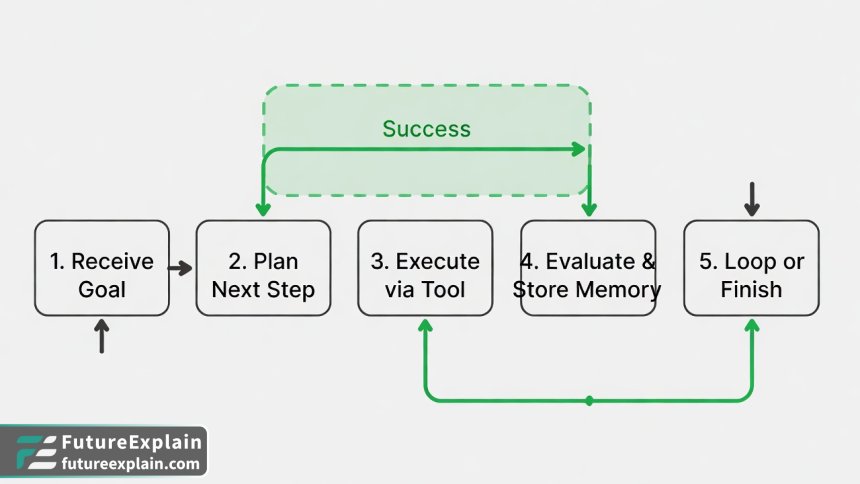
4. The Action Execution Loop (The "Engine")
This is the core program that ties everything together. It's a loop that continuously:
- Takes the current goal and memory.
- Asks the planner: "What's the next step or tool to use?"
- Executes the chosen tool with the specified parameters.
- Observes the result and stores it in memory.
- Evaluates if the goal is met. If not, it repeats from step 1.
This loop continues until the task is complete or an error forces it to stop.
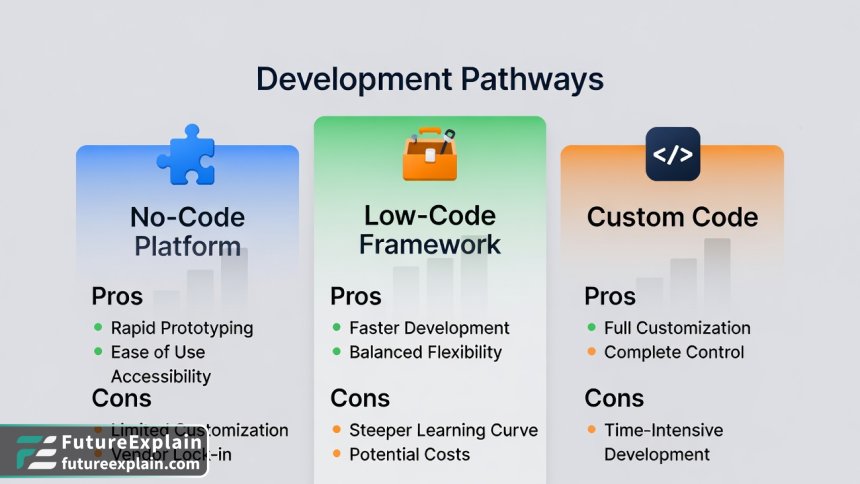
Choosing Your Path: No-Code, Low-Code, or Code?
You have several options for building your agent, each with a different balance of ease, flexibility, and control. Let's explore the three main pathways.
Path 1: No-Code Agent Platforms
This is the fastest way to get started, ideal for testing concepts and building simple workflow automations without writing a single line of code.
How it Works: Platforms like Zapier or Make (Integromat) provide visual canvases where you connect "triggers" and "actions." You can integrate an AI step (like OpenAI's GPT) into these workflows to add decision-making. For example, you could build a "Customer Email Triage" agent: 1) Trigger: New email arrives in Gmail. 2) Action: Send email content to GPT-4 with a prompt to classify urgency. 3) Action: If urgent, create a task in Notion; if not, save to a read-later folder.
Pros: Extremely quick to prototype. Great for integrating with common business apps (Slack, Google Sheets, etc.). Accessible to anyone.
Cons: Limited in complex reasoning and custom tool use. Can become expensive at scale. You're often locked into the platform's capabilities.
Path 2: Low-Code Agent Frameworks
This is the recommended starting point for most technical beginners. It provides a structured way to build powerful agents while handling much of the complex plumbing for you.
How it Works: Frameworks like LangChain and LlamaIndex (for Python) or LangChain.js (for JavaScript) are libraries that provide pre-built components for memory, tool calling, and agent loops. You write configuration code to define your tools and agent's goal, and the framework manages the interaction with the LLM.
Example (Conceptual): With LangChain, you can create a simple agent in under 20 lines of Python code by defining tools (e.g., a search tool, a math tool) and then using its built-in agent executor.
Pros: Offers a great balance of control and ease. Vast ecosystem of pre-built tools and integrations. Large community and documentation. Easier to debug than no-code.
Cons: Requires basic programming knowledge (Python/JS). You still need to understand core concepts.
Path 3: Custom-Code Agent (From Scratch)
This approach is for those who want deep understanding and maximum control, building the agent loop and LLM interactions manually.
How it Works: You would use the direct API of an LLM provider (like OpenAI, Anthropic, or a local model) and write all the code for the planning loop, memory management, and tool execution yourself. This is an excellent learning project.
Pros: Complete control over every aspect. No dependency on a framework's abstractions. Best for learning the fundamentals.
Cons: Time-consuming. Requires solid programming skills. You must handle errors, parsing, and state management that frameworks provide automatically.
For the rest of this guide, we will focus on the Low-Code path using Python and LangChain, as it is the most practical for beginners who want to build something real while learning the underlying mechanics.
Project: Building a "Research Assistant" Agent
Let's build a practical agent that can autonomously research a topic, gather information from the web, and compile a summary report. This project will solidify all the concepts we've discussed.
Step 1: Setting Up Your Environment
First, you'll need a Python environment. We recommend using Google Colab for a free, no-setup experience, or a local Python installation (3.8+).
Install the required libraries: Open a terminal or a Colab notebook cell and run:
pip install langchain langchain-openai langchain-community duckduckgo-searchThis installs the LangChain core, the connector for OpenAI's models, community tools, and a tool for web search.
Step 2: Defining the Tools
Our agent needs eyes on the web. We'll give it a search tool. Create a new Python file (e.g., research_agent.py) and start coding.
Code Example: Setting Up a Search Tool
from langchain.tools import DuckDuckGoSearchRun
from langchain.agents import Tool

# Instantiate the search tool
search = DuckDuckGoSearchRun()

# Define it as a LangChain Tool object
search_tool = Tool(
    name="Web Search",
    func=search.run,
    description="Useful for searching the internet for current information on any topic. Input should be a clear search query."
)
We now have a tool named "Web Search" that the agent can call. The description is crucial—the LLM uses it to decide when to use this tool.
Step 3: Creating the Agent with Memory
Next, we'll set up the LLM that will act as the agent's brain and give it a memory.
from langchain_openai import ChatOpenAI
from langchain.memory import ConversationBufferMemory
from langchain.agents import initialize_agent, AgentType

# Set your OpenAI API key (store this securely in environment variables in a real project)
import os
os.environ["OPENAI_API_KEY"] = "your-api-key-here"

# Initialize the LLM. We use GPT-3.5-turbo for cost-effectiveness.
llm = ChatOpenAI(model="gpt-3.5-turbo", temperature=0)

# Give the agent a memory to remember the conversation history
memory = ConversationBufferMemory(memory_key="chat_history", return_messages=True)

# Create a list of the tools our agent will have
tools = [search_tool]

# Initialize the agent
agent = initialize_agent(
    tools,
    llm,
    agent=AgentType.CONVERSATIONAL_REACT_DESCRIPTION, # A good agent type for chat-based tools
    verbose=True, # This will print the agent's thought process, great for debugging!
    memory=memory,
    handle_parsing_errors=True # Helps if the LLM outputs malformed instructions
)
Step 4: Running Your First Autonomous Task
Now, let's give our agent a goal and watch it work.
# Define the research goal
goal = "Find out what the key differences are between Llama 3 and GPT-4, and summarize them in a bulleted list."

# Run the agent
result = agent.run(goal)
print("Agent's Result:")
print(result)
When you run this with verbose=True, you'll see the agent's internal monologue in your console. It might look like this:
Thought: I need to find recent comparisons between Llama 3 and GPT-4. I should search the web.
Action: Web Search
Action Input: "Llama 3 vs GPT-4 key differences 2024"
Observation: [Search results about model size, licensing, cost, performance benchmarks...]
Thought: I have some information. I should search for more specific details on performance.
Action: Web Search
Action Input: "Llama 3 GPT-4 benchmark scores MMLU"
...
Thought: I now have enough information to compile a summary.
Action: Final Answer
...
Your agent has just autonomously decided to search the web (potentially multiple times with refined queries), synthesized the information, and produced a summary. You've built an autonomous research assistant!
Leveling Up: Advanced Concepts and Best Practices
With your basic agent working, here are key concepts to improve its reliability, safety, and usefulness.
Prompt Engineering for Agents
The instructions you give the LLM are its "personality" and operational guidelines. A good system prompt is critical. When initializing your agent, you can provide a custom prompt:
from langchain.prompts import MessagesPlaceholder
from langchain.agents import AgentExecutor

agent_kwargs = {
    "system_message": "You are a precise and thorough research assistant. Always cite your sources. If you are unsure about an answer, say so. Do not make up information. Your primary tool is web search."
}
# You would pass agent_kwargs during agent initialization
Managing Cost and Efficiency
Agentic workflows can make many LLM calls, which costs money and time. The Stanford AI Index 2025 reports that inference costs have dropped dramatically, but optimization is still key[citation:10].
- Use Smaller Models for Simpler Tasks: Consider cheaper, faster models like GPT-3.5-Turbo or open-source models (via Ollama) for steps that don't require deep reasoning.
- Set Timeouts and Max Steps: Always limit the number of steps your agent can take (
max_iterations=15) to prevent infinite loops from running up bills. - Cache Responses: For repetitive queries, implement a simple cache so your agent doesn't pay to search for the same thing twice.
Safety, Oversight, and "The Big Red Button"
Autonomy requires safeguards. Deloitte's 2026 Tech Trends report warns that a primary reason agent projects fail is automating broken processes without human oversight[citation:9].
- Human-in-the-Loop (HITL): Design your agent to pause and ask for approval before taking significant actions (e.g., sending an email, making a purchase).
- Clear Boundaries: Define what your agent is not allowed to do in its system prompt (e.g., "You cannot make financial transactions").
- Logging: Keep detailed logs of every thought, action, and result. This is essential for debugging and auditing.
Next Steps and Further Learning
Your research agent is a foundational project. Here’s where to go from here:
- Add More Tools: Integrate a RAG system so it can read your personal documents. Add a tool to save summaries directly to Google Docs or Notion.
- Build a Personal Productivity Agent: Create an agent that monitors your calendar, suggests focus times, and drafts email responses based on your schedule.
- Explore Multi-Agent Systems: This is an advanced frontier where multiple specialized agents work together. One agent could research, another write, and a third fact-check.
The journey into building autonomous agents is one of the most exciting in modern technology. You start by automating a small, tedious task and gradually expand your agent's world. Remember the principle from industry leaders: focus on solving a specific, meaningful problem rather than just showcasing technology[citation:9]. Start simple, ensure robust oversight, and iterate. You now have the knowledge and a working prototype to begin.
Further Reading
Share
What's Your Reaction?
 Like
0
Like
0
 Dislike
0
Dislike
0
 Love
0
Love
0
 Funny
0
Funny
0
 Angry
0
Angry
0
 Sad
0
Sad
0
 Wow
0
Wow
0


For wildlife monitoring in cold climates, battery life drops significantly. Any tips for Arctic deployments?
The healthcare regulatory discussion in the comments is valuable. We're navigating FDA Class II for our diagnostic device. It's challenging but possible with proper documentation.
I used the business case framework to justify our smart building project. Calculated 14-month payback period. Approved last week!
The comparison of optimization techniques needs more real numbers. "2-4x power reduction" - is that for inference only or including memory access?
Dmitry, good question. The 2-4x includes both compute and memory. Quantization reduces memory bandwidth (fewer bytes transferred) and simplifies arithmetic (integer vs float ops). On some chips with dedicated INT8 units, gains can be even higher.
As a privacy advocate, I'm thrilled to see edge AI gaining traction. Local processing should be the default, not the exception, for personal devices.
The future trends seem accurate based on my work at a semiconductor company. We're seeing demand for AI accelerators in everything from watches to thermostats.